
Pinia大菠萝--新一代状态管理
前言
如今已经是vue3+ts的时代,但对于我们的状态管理工具vuex来说,他也是存在一定的缺陷的,下文讲解pinia的由来和基础的用法,用于构建个人的轻量级项目。
Pinia大菠萝
pinia是新的一门状态管理工具,他是vue官方推荐的替代vuex的产品。特点如下:
- 拥有完整的ts支持,这点和vuex比起来更舒适。
- 更小的体积(约1kb)
- 没有muatation,只有action
- store可以直接使用,不需要辅助函数
pinia为什么体积小于vuex
这得从它们两者的代码分割机制来讲:
举个例子:某项目有3个store「user、job、pay」,另外有2个路由页面「首页、个人中心页」,首页用到job store,个人中心页用到了user store,分别用Pinia和Vuex对其状态管理。
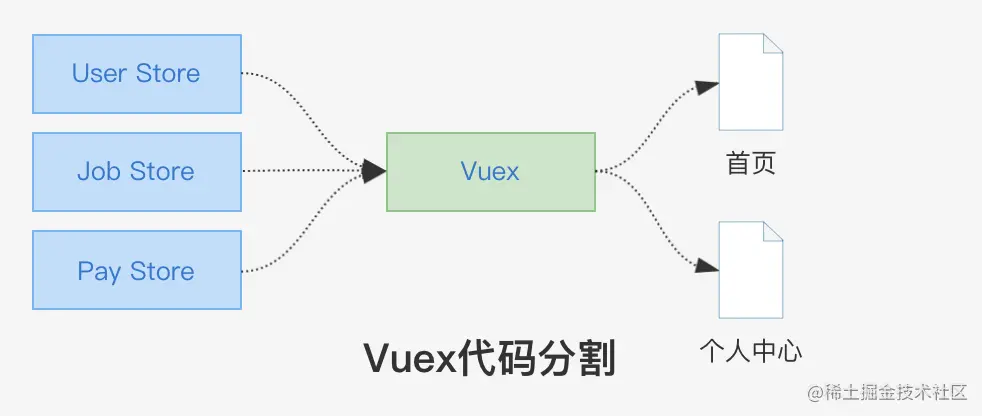
先看Vuex的代码分割: 打包时,vuex会把3个store合并打包,当首页用到Vuex时,这个包会引入到首页一起打包,最后输出1个js chunk。这样的问题是,其实首页只需要其中1个store,但其他2个无关的store也被打包进来,造成资源浪费。
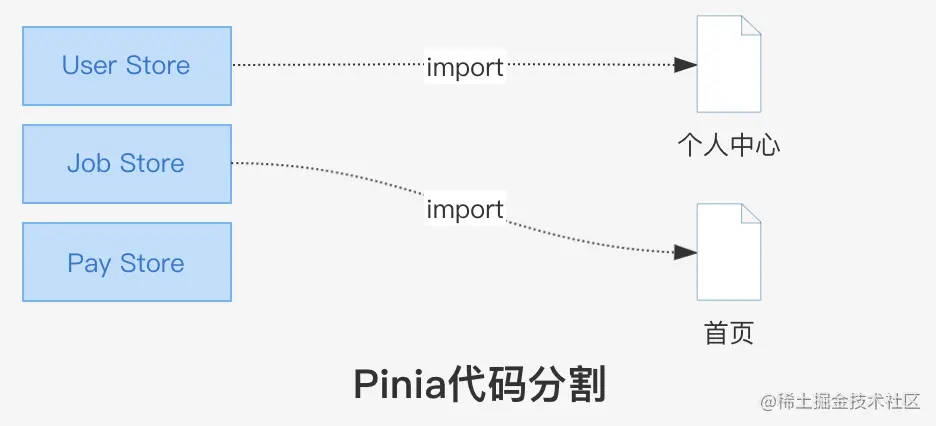
Pinia的代码分割: 打包时,Pinia会检查引用依赖,当首页用到job store,打包只会把用到的store和页面合并输出1个js chunk,其他2个store不耦合在其中。Pinia能做到这点,是因为它的设计就是store分离的,解决了项目的耦合问题。
总结:pinia根据引用打包store文件,但vuex就是全部打包。
安装pinia
1 | npm install pinia |
挂载实例
1 | import {createPinia} from 'pinia'; |
创建第一个store
在src/store/index.ts里面创建你的store,其中定义store的方式有两种
使用optionAPI模式定义,这种方式和vue2的类似
1
2
3
4
5
6
7
8
9
10
11
12
13
14
15
16
17
18
19import {defineStore} from 'pinia';
export const mainStore = defineStore('main',{
state:()=>{
return{
count:1
}
},
actions:{
increment(){
this.count++:
}
}
getters:{
doubleCount(){
return state.count * 2;
}
}
})使用setup模式定义,符合Vue3 setup的编程模式,让结构更加扁平化,更推荐使用这种方式
1
2
3
4
5
6
7
8
9
10
11
12
13
14
15
import {ref} from 'vue';
import {defineStore} from 'pinia';
export const mainStore = defineStore('main',()=>{
const count = ref<number>(1);
const increment:number = ()=>{
count.value++;
}
const doubleCount:number = ()=>{
return count.value*2;
}
return {count,increment,doubleCount};
})
state定义数据,action放同步或者异步的方法,getters获取state的计算结果
上面两个的方式效果都是一样的,区别在于使用了setup的方式更贴近于vue3,然后我们不用在意action和getters关键字。而第一种方式的话,我们还是需要写getters和actions等来区分我们的代码
调用store的数据
这一部分讲解怎么调用store的数据,主要是解析响应式数据,对于ref我们需要引入storeToRefs再解构,否则丢失响应
code 使用setup的格式1
2
3
4
5
6
7
8
9
10
11
12import {mainStore} from '@/store/mainStore.ts';
import {storeToRefs} from 'pinia';
setup(){
const store = mainStore();
//解析数据 可以解构reactive的
const { data } = store;
//ref类型需要这样
const { refData } = storeToRefs(store);
const { fun1,fun2 } = store;
//使用ref的数据
console.log(refData.value);
}
创建多个store
项目复杂了就需要多个store管理。其实pinia创建新的store方式很简单,就是export的时候命名和文件名一致就行了。
1 | // index.js |