MileStone项目杂谈
前言
最近博客没更新的原因是,emm在搞一个新的项目,完全的从0开始没有参考任何项目视频,然后现在也是项目大体功能要做完了,就在这里写一下本次项目踩过的坑以及一些经验,算是一期杂谈。
源码地址:传送门1
项目演示地址:传送门2
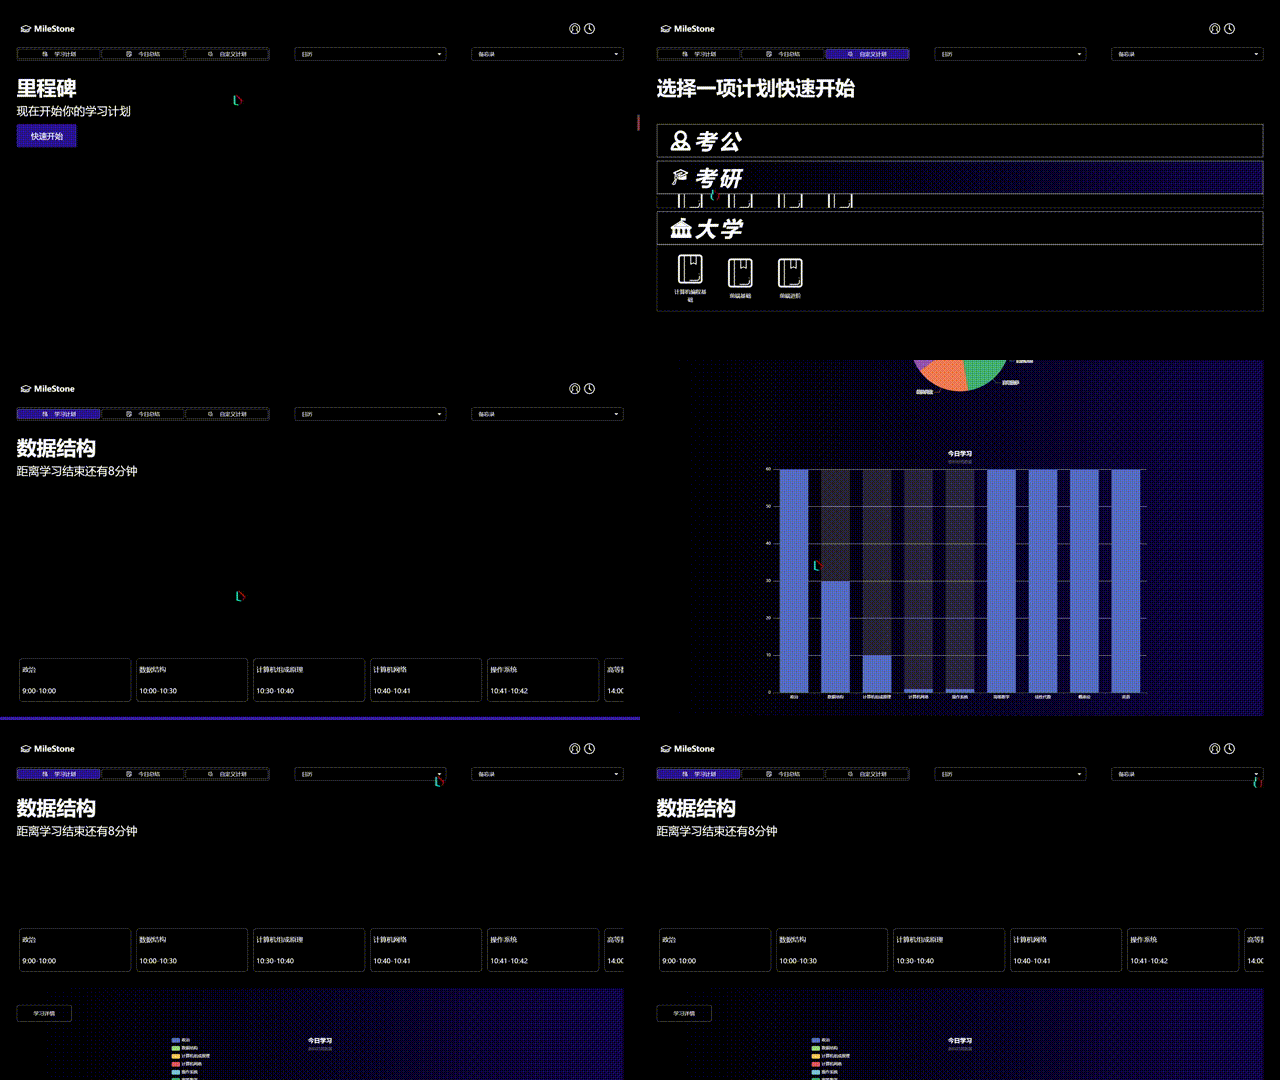
主体演示
制作完毕~
构建工具+技术栈
编译软件:vscode
开发框架: vue2
打包工具:vue-cli
UI:vuetify
icon:阿里巴巴
其他:vuex, vue-router,git
插件:pubsub,nanoid,less-loader,vuex-persist
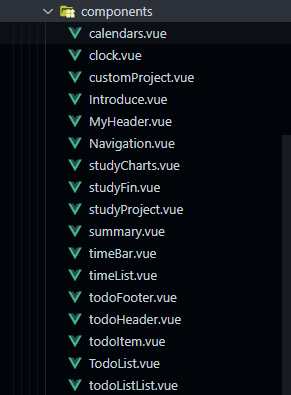
组件列表
项目难点
本次项目综合了很多方面的问题,比如vuex模块化加数据持久化,对所有任务的时间排序,以及vuetify的栅格系统等等,各种方面的问题哈哈,但好在最后都能够解决出来
vuex模块化结合本地化存储
vuex是一个很方便的官方提供的数据管理插件,但在使用的时候一遇到刷新就会导致数据丢失的问题。于是想到了localStorage结合本地存储的方式进行数据持久化。
原理很简单 对于自己设置的数据先使用JSON.parse(localStorage.getItem('xxx'))
然后在mutations里面对于需要增删改查的操作最后进行一次localStorage.setItem("xxx", JSON.stringify(state.xxx));
部分代码:1
2
3
4
5
6
7
8
9
10
11
12
13
14
15
16
17
18
19
20
21
22
23var todoObj = JSON.parse(localStorage.getItem("todoObj")) || [
{id: "X5DX4v8Wz4r97xjs", title: "阿斯顿", done: false}
];
------------------------------------------------------------------------
updatedType(state, [people, subject, typeId, typeValue]) {
console.log(typeValue);
state.dataList.forEach(data => {
if (data.people === people) {
data.kemu.forEach(kemu => {
if (kemu.subject === subject) {
kemu.typeList.forEach(typelist => {
if (typelist.id === typeId) {
Vue.set(typelist, 'type', typeValue[0]);
Vue.set(typelist, 'time', typeValue[2]);
Vue.set(typelist, 'remarks', typeValue[1]);
}
})
}
})
}
});
localStorage.setItem('dataList', JSON.stringify(state.dataList));
},
但是这个方法也有一个弊端,就是每次执行增删改查的操作都需要进行一次手动存储,在操作多的情况下非常不适合。于是找到了这个vuex的插件vuex-presist来帮助模块进行本地存储
实质上就是进行了本地存储,当然也有新的类型比如session和cookie
安装:1
npm install --save vuex-persist
引入1
import VuexPersistence from 'vuex-persist'
定义 (此处是根据我的两个模块来使用)1
2
3
4const vuexLocal = new VuexPersistence({
storage: window.localStorage,
modules: ['dataListOptions', 'todoOptions']
})
引入到vuex1
2
3
4
5
6
7
8// 创建并暴露store
export default new vuex.Store({
modules: {
dataListOptions,
todoOptions
},
plugins: [vuexLocal.plugin]
})
注意此处的引入位置
vuex模块化踩坑
当vuex要使用很多options的时候,会采用模块化的方式来写代码会比较方便管理。
比如定义一个todoOptions 里面就要有store的全部方法 以及一个namespaced属性
1 | const todoOptions ={ |
到这一步其实大多数时候都没有问题 出问题在于使用到mutation或者actions的时候1
2
3
4
5
6//此处需要使用名字/方法否则不行
this.$store.dispatch(
"dataListOptions/transType",
this.$route.params.people
);
如果用到了mapState插件或者其他的,也需要加名字 注意是要用双引号1
...mapState("todoOptions", ["todoObj"]),
以及最后其实vuex的value是可以传多个参数的,用数组或者对象的形式1
2
3
4this.$store.commit("dataListOptions/addType", [
this.$route.params.people,
this.subject,
]);
准确获取时区
一般大家使用时间都是直接用new Date()但这个方法获取的并不是完全准确的时区时间,采用下面的方法可以获取更为准确的时间
1 | selectTimezone() { |
时间排序
项目中需要将自定义的任务进行一个时间的排序最后呈现到学习计划页面
预览
当一开始的时间格式是14:00-15:00这样的1
2
3
4
5
6
7
8
9
10
11
12
13
14
15
16
17
18
19
20subject: "数学",
typeList: [{
id: '001',
type: "高等数学",
time: '14:00-15:00',
remarks: '暂无'
},
{
id: '002',
type: "线性代数",
time: '15:00-16:00',
remarks: '暂无'
},
{
id: '003',
type: "概率论",
time: '16:00-17:00',
remarks: '暂无'
}
]
于是想到了split方法去分割第一个时间点,1
2
3
4
5
6
7
8
9
10let res = [];
let indexArr = [];
this.$store.state.dataListOptions.typeList.forEach((item, index) => {
let hhmm = item.time.split("-", 1)[0];
let hh = hhmm.split(":");
let sum = hh.reduce((total, val) => {
return (total += val);
}, "");
res.push(parseInt(sum));
});
然后将第一个时间点化为1400的形式,以此类推。只要对比第一个时间点就可以完成排序,这样一来就可以使用sort方法,但问题又出现了,这样比较之后需要将时间还原回去才能在原本的数组里面找到对应的任务名称。或者是知道数组下标的形式?那么如何知道排序后原先时间数组的下标呢?1
2let typeMap = new Map();
typeMap.set(parseInt(sum), index);
使用到map类里面的set方法,将原先的数据和下标传入到map中,最后遍历排序后的时间数组,通过get方法去查找数据原先对应的下标1
2
3
4
5
6
7
8
9
10
11
12
13
14
15
16
17
18
19
20
21
22
23
24
25
26
27
28
29
30
31
32
33typeList() {
let res = [];
let typeMap = new Map();
let indexArr = [];
this.$store.state.dataListOptions.typeList.forEach((item, index) => {
let hhmm = item.time.split("-", 1)[0];
let hh = hhmm.split(":");
let sum = hh.reduce((total, val) => {
return (total += val);
}, "");
res.push(parseInt(sum));
typeMap.set(parseInt(sum), index);
});
console.log("排序前的res", res);
res.sort(function (a, b) {
return a - b;
});
console.log("排序后的res", res);
res.forEach((item) => {
indexArr.push(typeMap.get(item));
});
console.log("下标", indexArr);
let finalArr = [];
indexArr.forEach((item) => {
this.$store.state.dataListOptions.typeList.forEach((data, index) => {
if (index === item) {
finalArr.push(data);
}
});
});
console.log("最终数组", finalArr);
return finalArr;
},
时间排序2
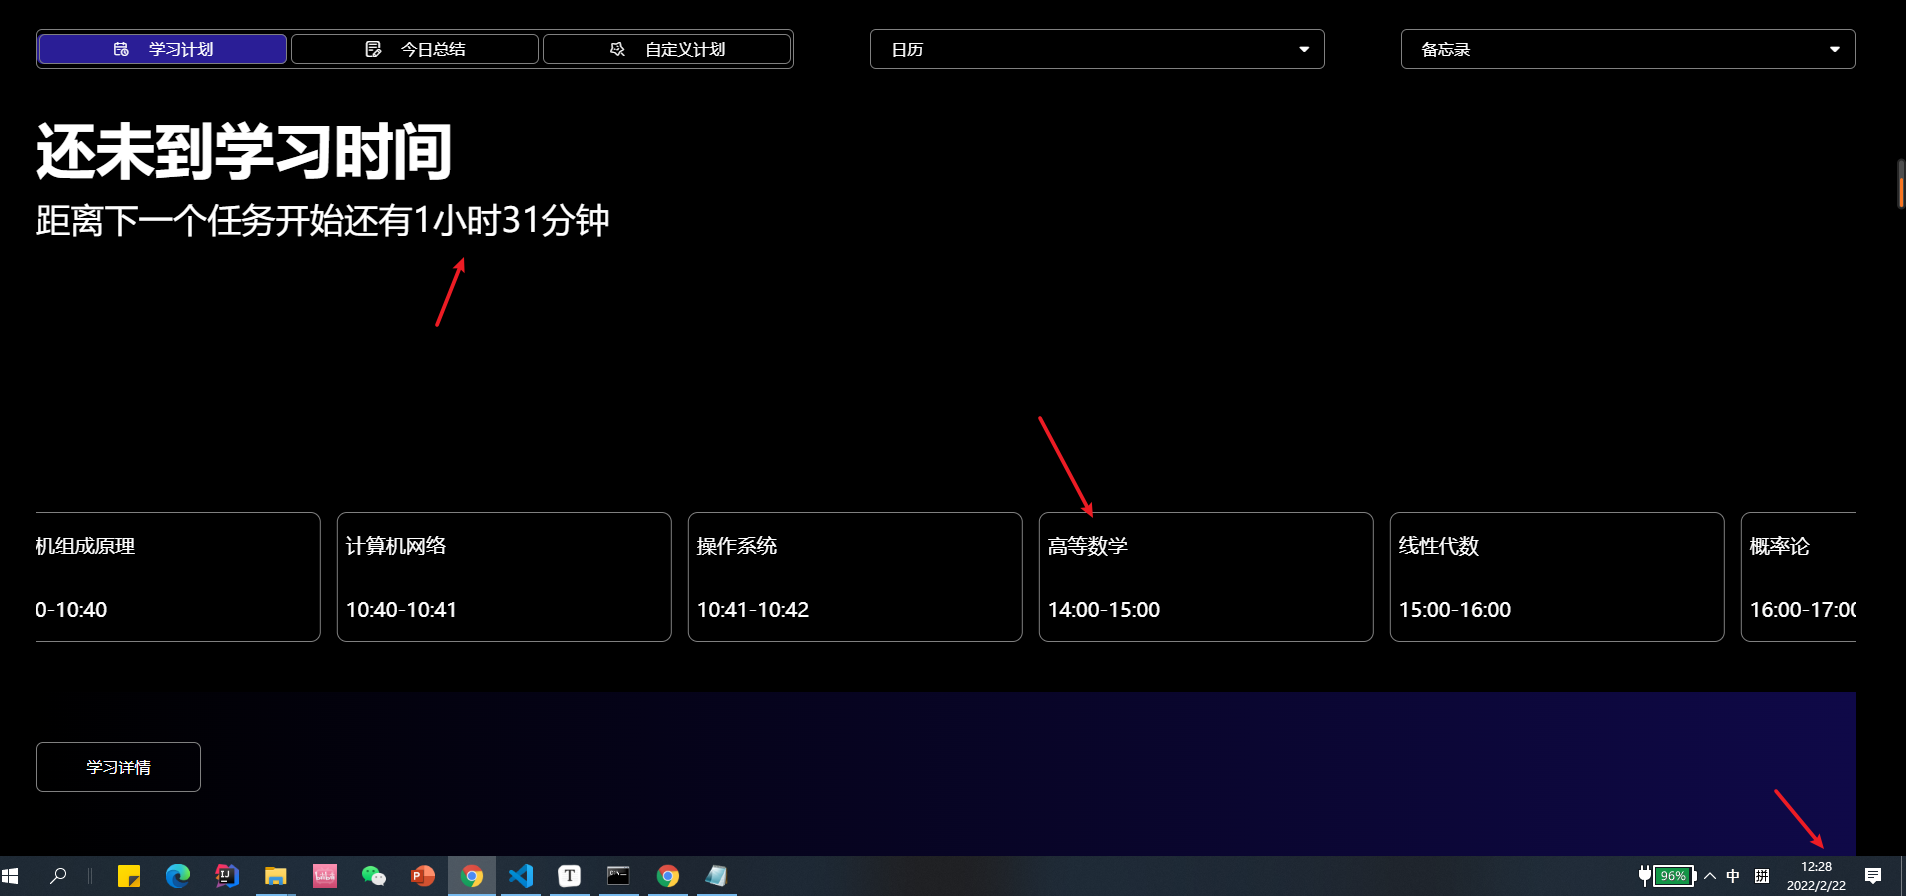
项目中还有一个地方需要用到时间排序,就是页面中这个introduce的地方,它会随着任务的执行判断时间,然后返回相应的内容到页面上
预览
需求是有三种判断
一是任务没有开始 那么就显示下个任务还有xx时xx分开始,如果不到1小时,则返回xx分
二是任务正在执行中 那么显示该任务还有xx时xx分结束,如果不到1小时,则返回xx分
三是任务都执行完了 此时显示今日任务已完毕,查看今日总结
获取任务数组这块就不说了 用的是消息的订阅和发布,收到的是已经排序好时间的任务数组
那么为了执行现在的时间是否在某个任务时间段内,就需要三个变量,一个是现在时间,一个是当前任务开始时间,结束时间1
2
3
4
5
6
7
8
9
10
11
12
13
14
15
16
17
18
19
20
21
22
23
24
25
26 this.pid = pubsub.subscribe(
"judgeTime",
(msg, [timeArr, typeNameArr, len]) => {
try {
timeArr.forEach((item, index) => {
var hhmm = item.split("-");
var strTime1 = hhmm[0].split(":");
var strTime2 = hhmm[1].split(":");
var b = this.selectTimezone();
var e = this.selectTimezone();
var n = this.selectTimezone();
b.setHours(strTime1[0]);
b.setMinutes(strTime1[1]);
b.setSeconds(0);
b.setMilliseconds(0);
e.setHours(strTime2[0]);
e.setMinutes(strTime2[1]);
e.setSeconds(0);
e.setMilliseconds(0);
if (b.getTime() - n.getTime() > 0) {
this.typeName = "还未到学习时间";
console.log(b);
this.beginTime = b;
this.state = "start";
······
然后比较它们的时间戳,细节上为了准确的比较还得把秒和毫秒设置01
2
3
4
5
6
7
8
9
10
11
12
13
14
15
16
17
18
19
20
21
22
23
24
25
26calTime() {
var n = this.selectTimezone();
var chazhi = this.beginTime - n;
this.minutes = Math.floor((chazhi / 1000 / 60) % 60);
this.hours = Math.floor((chazhi / 1000 / 60 / 60) % 24);
if (this.hours > 0) {
if (this.state === "start") {
this.endTime = `距离下一个任务开始还有${this.hours}小时${this.minutes}分钟`;
} else if (this.state === "end") {
this.endTime = `距离学习结束还有${this.hours}小时${this.minutes}分钟`;
}
} else {
if (this.state === "start") {
this.endTime = `距离下一个任务开始还有${this.minutes}分钟`;
} else if (this.state === "end") {
this.endTime = `距离学习结束还有${this.minutes}分钟`;
}
}
if (chazhi > 0) {
setTimeout(() => {
this.calTime();
}, 1000);
} else {
this.$router.go(0);
}
},
此处有个难点,就是在定时器代码那里,如果使用的是setInterval那么可能在下个时间段的时候,前面的代码计算比较复杂,他会跳过当前的这个时间应该执行的任务(代码队列之前的任务没有处理完,js引擎只能允许一份未执行的代码),这方面的问题要去了解js的事件循环机制,于是这里采用了setTimeout来反复调用自身,最后当差值小于或等于0的时候利用routergo刷新页面
最后在补充一下剩下的判断代码1
2
3
4
5
6
7
8
9
10
11
12
13
14
15
16
17
18
19
20
21
22
23
24if (b.getTime() - n.getTime() > 0) {
this.typeName = "还未到学习时间";
console.log(b);
this.beginTime = b;
this.state = "start";
this.calTime();
localStorage.removeItem("dayEnd");
throw new Error("end");
} else if (
n.getTime() - b.getTime() >= 0 &&
n.getTime() - e.getTime() < 0
) {
this.typeName = typeNameArr[index];
this.beginTime = e;
this.state = "end";
this.calTime();
localStorage.removeItem("dayEnd");
throw new Error("end");
} else if (index === len - 1 && n.getTime() - e.getTime() >= 0) {
this.typeName = "今日任务已完成";
this.endTime = "点击查看今日总结~";
localStorage.setItem("dayEnd", "end");
throw new Error("end");
}
性能优化
- 采用了插件webpack-bundle-analyzer分析了项目中js文件占据的空间,又利用了bootcdn将插件以cdn的方式引入,减小了打包的时候生成的js体积。
- echarts采用了按需引入的方式,减少了所需的js体积
收获
本次项目是对vue2练手的独立项目,从该项目中我收获到了有关vuex模块化以及数据持久化的处理,时间算法和事件循环的操作,并加深了vuetify-ui的使用,尤其是栅格系统和断点系统,最后针对项目进行了打包优化,结合cdn提升了访问速度。


