
Node.js结合express-jwt的实战教程
前言
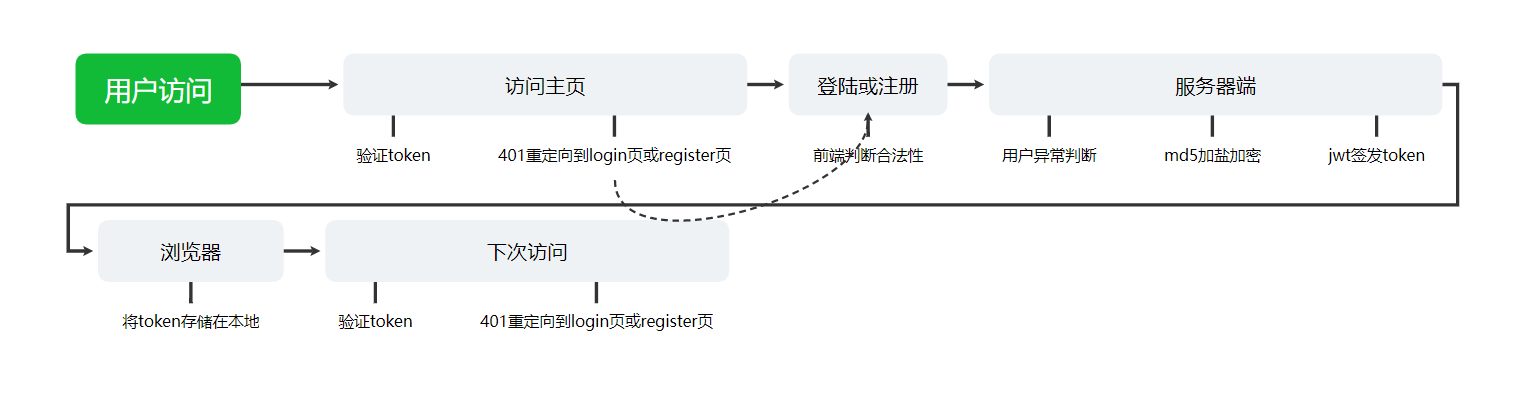
本文记录node使用express-jwt校验token以及前端发送token的全过程
什么是Token?什么是JWT?
Token产生原因:常规模式的session存放用户登录态导致服务器压力大,服务器多的时候,需要同步session,于是诞生了token,存到客户端,由服务端被动验证
缺点:
- 被动验证,导致收回权限稍微困难.
- 每次请求都要携带,增加性能开销
JWT: Json Web Token,一种token的验证方式,本质上是带有前面的json数据.
JWT由三部分组成:
- Header:描述JWT的元数据,定义了生成签名的算法以及Token的类型
- Payload:用于存放实际需要传递的数据
- Signature:签名,服务器通过Payload、Header和一个密钥(secret)使用 Header 里面指定的签名算法(默认是 HMAC SHA256)生成。
后端职责
使用md5对密码进行加盐加密放入数据库,使用jwt在合适的时机发放token以及token的校验,模块化以及代码复用.
后端项目目录
vscode的project-tree插件生成
1 | footok |
安装依赖
1 | npm i --save express |
db部分(数据库的配置)
1 | const mysql = { |
utils部分
该部分负责md5.jwt和mysql的连接配置
constant.js 定义固定参数
1 | module.exports = { |
这里是定义参数的地方,还有些成功和失败的响应码可以和前端协商.
user-jwt.js 定义jwt校验规则
1 | const jwt = require('jsonwebtoken'); // 引入验证jsonwebtoken模块 |
这里比较容易踩坑的地方是这个Bearer,这里分两种情况:
- 前端请求发送token的时候,自己添加了Bearer,组成
Bearer token - 后端响应发送token的时候,自己添加了Bearer,组成
Bearer token
不管是上面哪一种签发,验证都需要去掉Bearer,用后面的东西进行校验.
这个unless也比较容易踩坑,一般来说,登陆和注册是不需要权限的,所以默认会有这两个.
md5.js 定义md5
这部分就不用多说了,常规操作1
2
3
4
5
6const crypto = require('crypto'); // 引入crypto加密模块
function md5(s) {
return crypto.createHash('md5').update('' + s).digest('hex');
}
module.exports = md5;
index.js 封装数据库的查询
1 | const mysql = require('mysql'); |
services层
对于很久没有使用node的小伙伴,这里提醒一下,node获取get请求的请求体使用的方法是req.query.xxx,获取post的请求体的方法是req.body.xxx(前提是装了body-parser),以及单条数据查询的时候,最好使用解构的方式,比如说对于下面的sql查询1
select count(*) as count from foodData where tag = '炒'
那么获取的时候,就应该是1
let {count} = result[0];
如果下面的代码测试不行,可以将代码写在app.js里面测试,因为很大程度上是你的路径没有写对.
userService
1 | const { |
md5的加盐可以自己定义,比如一个secret key或者是什么别的常量,层级也可以相应深一点
这里的token我选择了在后端加上Bearer返回给前端
routes层
users
1 | const express = require('express'); |
index
1 | const express = require('express'); |
这里有一点比较重要,如果没有分类的话,那么这里的router.use('/', userRouter);路径直接写斜杠即可
app层
1 | const bodyParser = require('body-parser'); // 引入body-parser模块 |
依然是路径需要注意
至此后端的部分就已经写完了,接下来是前端的部分
前端职责
前端负责登陆和注册的页面编写,请求的编写,axios的封装
前端目录
这里比较多,简单说一下几个模块1
2
3
4
5
6
7- components
- userLogin.vue //登陆模块
- userRegister.vue //注册模块
- api
- apiInfo.js //接口信息
- axios.js /封装axios
- vite.config.js //vite配置
vite配置
这一部分主要是解决跨域的问题,然后起别名方便后续的代码路径编写1
2
3
4
5
6
7
8
9
10
11
12
13
14
15
16
17
18
19
20
21
22
23
24
25
26
27
28
29
30
31
32
33
34
35
36
37
38
39
40
41
42
43
44
45
46
47
48
49
50
51
52
53
54
55
56import {
defineConfig
} from 'vite'
import { resolve } from 'path'
import vue from '@vitejs/plugin-vue'
function pathResolve(dir) {
return resolve(__dirname, ".", dir)
}
// https://vitejs.dev/config/
export default defineConfig({
plugins: [vue()],
resolve:{
alias:{
"@":pathResolve("src/"),
"assets":pathResolve("src/assets"),
"common":pathResolve("src/components/common"),
"userLogin":pathResolve("src/components/userLogin"),
"swiper":pathResolve("src/components/swiper"),
"share":pathResolve("src/components/share"),
"category":pathResolve("src/components/category"),
"map":pathResolve("src/components/map"),
"person":pathResolve("src/components/person"),
"store":pathResolve("src/stores"),
"plugins":pathResolve("src/plugins"),
"myApi":pathResolve("src/api"),
"utils":pathResolve("src/utils")
},
extensions:['.js','.json','.ts']
},
base: './',
build: {
target: 'modules',
outDir: 'dist', //指定输出路径
assetsDir: 'assets', // 指定生成静态资源的存放路径
minify: 'terser' // 混淆器,terser构建后文件体积更小
},
server: {
cors: true, // 默认启用并允许任何源
open: true, // 在服务器启动时自动在浏览器中打开应用程序
//反向代理配置,注意rewrite写法,开始没看文档在这里踩了坑
port: 3000,
https: false,
proxy: {
'/api': {
target: 'http://localhost:8081',
changeOrigin: true,
rewrite: (path) => path.replace(/^\/api/, '')
},
'/ipApi': {
target: 'http://pv.sohu.com',
changeOrigin: true,
rewrite: (path) => path.replace(/^\/ipApi/, '')
}
}
}
})
axios的封装
先讲一下axios的封装,这个对于后续的token发送特别重要,如果你已经会设置拦截器,这一部分可以跳过
目的:通过请求拦截器,对需要权限的接口自动携带token验证.
分为以下几个part:
- 基础配置
- 取消重复请求
- 自动携带token
基础配置
就是配置统一的url和超时配置1
2
3
4
5
6
7
8import axios from 'axios';
function myAxios(axiosConfig){
const service = axios.create({
baseURL:'http://localhost:3000',//设置统一url
timeout:10000 //十秒超时
})
}
export default myAxios;
取消重复请求
这个部分不是本文的重点,可以适当跳过
自动携带token
为了照顾ssr,这里要做一次判断然后再获取,发送token我们采取的方案是后端设置Bearer,所以这里前端直接发送即可.1
2
3
4
5
6
7
8
9
10
11
12
13
14
15service.interceptors.request.use(
config=>{
removePending(config);
// 自动携带token
if(getTokenAuth()&&typeof window !== 'undefined'){
config.headers.Authorization = getTokenAuth();
}
options.repeat_request_cancel&&addPending(config);
console.log('config',config)
return config;
},
error=>{
return Promise.reject(error);
}
)
完整代码1
2
3
4
5
6
7
8
9
10
11
12
13
14
15
16
17
18
19
20
21
22
23
24
25
26
27
28
29
30
31
32
33
34
35
36
37
38
39
40
41
42
43
44
45
46
47
48
49
50
51
52
53
54
55
56
57
58
59
60
61
62
63
64
65
66
67
68
69
70
71import axios from 'axios';
import {getTokenAuth} from 'utils/auth';
// 拦截器
// customOption:boolean 是否开启取消重复请求
function myAxios(axiosConfig,customOption){
const service = axios.create({
baseURL:'http://localhost:3000',//设置统一url
timeout:10000 //十秒超时
})
let options = Object.assign({repeat_request_cancel:false},customOption);
service.interceptors.request.use(
       config=>{
           removePending(config);
           // 自动携带token
           if(getTokenAuth()&&typeof window !== 'undefined'){
               config.headers.Authorization = getTokenAuth();
           }
           options.repeat_request_cancel&&addPending(config);
           console.log('config',config)
           return config;
       },
       error=>{
           return Promise.reject(error);
       }
   )
service.interceptors.response.use(
response=>{
removePending(response);
return response
},
error=>{
error.config&&removePending(error.config);
return Promise.reject(error);
}
)
return service(axiosConfig);//返回的是一个promsie对象
}
// 取消重复请求
// 判断重复请求并存入队列
const pendingMap = new Map();
// 生成每个请求唯一的键
function getPendingKey(config){
let {url,method,params,data} = config;
if(typeof data === 'string')data=JSON.parse(data)//响应回来的config data是一个字符串
return [url,method,JSON.stringify(params),JSON.stringify(data)].join('&');
}
// 存储每个请求的值,也就是cancel方法,用于取消请求
function addPending(config){
const pendingKey = getPendingKey(config);
config.cancelToken = config.cancelToken || new axios.CancelToken((cancel)=>{
if(!pendingMap.has(pendingKey)){
pendingMap.set(pendingKey,cancel);
}
})
}
// 删除重复的请求
function removePending(config){
const pendingKey = getPendingKey(config);
if(pendingMap.has(pendingKey)){
const cancelToken = pendingMap.get(pendingKey);
cancelToken(pendingKey);
pendingMap.delete(pendingKey);
}
}
export default myAxios;
接口信息
这一部分是为了方便后期接口的管理而写1
2
3
4
5
6
7
8
9
10
11
12
13
14
15
16
17import myAxios from './axios';
// 用户登陆
export function userLoginAPI(data) {
return myAxios({
url: '/api/login',
method: 'post',
data
})
}
// 用户注册
export function userRegisterAPI(data){
return myAxios({
url:'/api/register',
method:'post',
data
})
}
登陆模块逻辑
页面的代码就不放了,大致的请求逻辑如下
将数据发送到后端,得到成功的响应后将token放置在前端的localStorage中,或者cookie中.这里选择了localStorage
1 | import {userLoginAPI} from "myApi/apiInfo"; |
注册模块逻辑
页面的代码就不放了,注册的逻辑大概如下
- 做密码的校验,比如限制长度,大小写等.
- 发送用户信息,成功后设置token到本地,跳转到主页
1 | import {userRegisterAPI} from 'myApi/apiInfo'; |
获取token
1 | const TOKEN_KEY = 'token'; |
总结
本次对jwt和md5加密的登陆注册进行了一次编写,还有一些没有了解到的,比如以下问题:
- 吊销token(了解到是express-jwt里面的isRevoked)
- 是否需要每次访问有权限的接口都携带token(需要,因为只有这样才能判断)
- token的续签
关联知识点:
web网络安全XSS,CSRF
token,cookie,session