
Aplayer设置与优化
前言
本教程分为两个版本,一个是插件版本,一个是修改源代码的版本。两个版本选择一个即可。
预览效果

- 引入aplayer.pug
打开themes\hexo-theme-butterfly\layout\includes\head.pug里面添加1
include ./third-party/aplayer.pug
- 创建aplayer.pug
在themes\hexo-theme-butterfly\layout\includes\third-party下创建aplayer.pug内容如下1
2
3
4
5
6if theme.aplayer && theme.aplayer.enable
.aplayer(data-id=theme.aplayer.id data-server=theme.aplayer.server data-type=theme.aplayer.type data-fixed=theme.aplayer.fixed data-mini=theme.aplayer.mini data-listFolded=theme.aplayer.listFolded data-order=theme.aplayer.order data-preload=theme.aplayer.preload)
each item in theme.aplayer.css
link(rel='stylesheet', href=item)
each item in theme.aplayer.js
script(src=item) - 打开主题配置文件
themes\hexo-theme-butterfly\_config.yml在最后加入
1 | aplayer: |
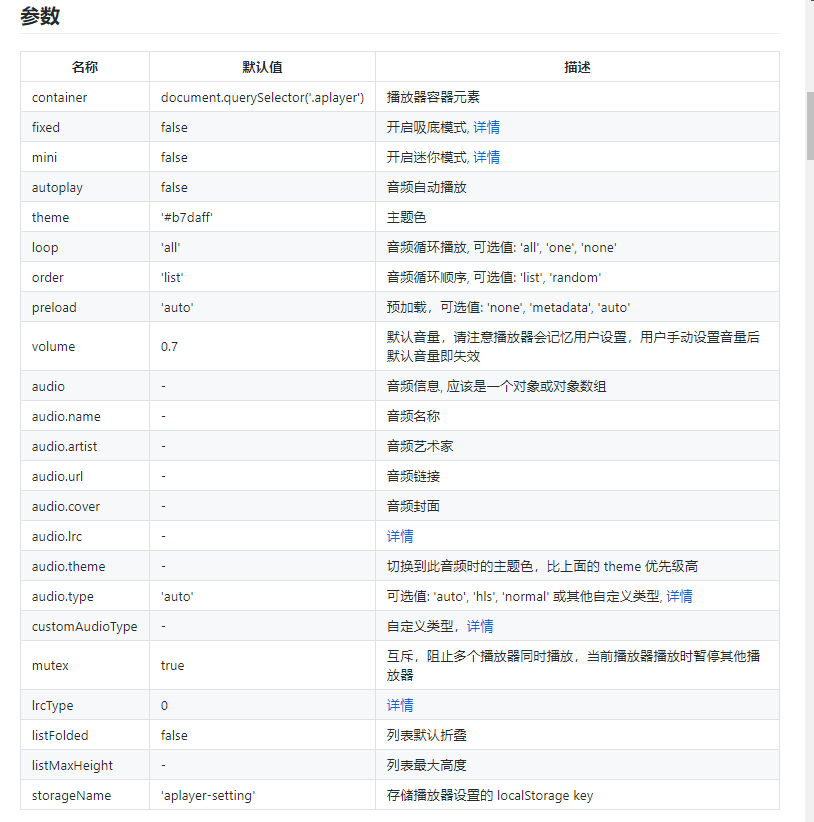
其中参数见下图
在博客根目录
[Blogroot]下打开终端,运行以下指令安装 hexo-tag-aplayer 插件:1
npm install hexp-tag-aplayer --save
在站点配置文件
[Blogroot]\_config.yml中新增配置项,建议直接加在最底下:1
2
3
4
5# APlayer
# https://github.com/MoePlayer/hexo-tag-aplayer/blob/master/docs/README-zh_cn.md
aplayer:
meting: true
asset_inject: false修改主题配置文件
[Blogroot]\_config.butterfly.yml中关于 Aplayer 的配置内容1
2
3
4# Inject the css and script (aplayer/meting)
aplayerInject:
enable: true
per_page: true在主题配置文件
[Blogroot]\_config.butterfly.yml的 inject 配置项中添加 Aplayer 的容器。1
2
3
4inject:
head:
bottom:
- <div class="aplayer no-destroy" data-id="5183531430" data-server="netease" data-type="playlist" data-fixed="true" data-mini="true" data-listFolded="false" data-order="random" data-preload="none" data-autoplay="false" muted></div>在博客根目录
[Blogroot]下打开终端,运行以下指令1
2
3hexo clean
hexo generate
hexo server关于更换歌单的问题,大部分同学都因为只更改了
data-id的值,所以出现歌单加载不出的情况,此处需要注意,data-id、data-server、data-type分别对应了歌单的id,歌单的服务商、歌单的类型,所以需要确认这三项是一一对应的。如图中所示,找到网易云歌单的url,https://music.163.com/#/playlist?id=4907060762`, 此处的palylist对应的就是data-type的值,id就是data-id的值,而网易云的data-server为netease,这个可以通过Aplayer的插件文档查阅到。只有三个参数对应正确才能正常加载歌单。Aplayer的网易云歌单接口时不时的会挂掉,所以如果你确定你配置正确,但是歌单还是没有出现。不妨去看看其他人的站点是不是也没有Aplayer标签了来判断是Aplayer本身接口的问题还是自己配置出错的问题。
收入侧边栏+修改配色和歌词
1 | .aplayer.aplayer-fixed.aplayer-narrow .aplayer-body{ |
1 | .aplayer.aplayer-fixed .aplayer-lrc { |
不间断播放
刚开始以为设置了pjax之后就会切换页面连续播放,但后面发现还是有问题,随后找文章发现是aplayer每次在进入页面就会重载一次。
引入1.2的metingjs里面的no-destroy方法
1.2版本metingjs下载地址:点击下载
修改主题配置文件themes\hexo-theme-butterfly\_config.yml1
2
3
4
5
6
7
8
9
10
11
12
13
14
15aplayer:
enable: true
js:
- https://cdn.bootcss.com/aplayer/1.10.1/APlayer.min.js
- ./lib/Meting.min.js
css:
- https://cdn.bootcss.com/aplayer/1.10.1/APlayer.min.css
id: 7123261369 //这个是你的歌单id
server: netease
type: playlist
fixed: 'true'
order: list
preload: none
listFolded: 'false'
autoplay: true
新建addnodestory.js,内容如下1
2var aplayer = document.getElementsByClassName('aplayer')[0];
aplayer.classList.add('no-destroy');
使用插件版
关于导入歌单
网易云右键你想要导入的歌单并复制链接,用网页打开